Use this action to add selected keywords from your discovery results or saved lists directly to a search results ad group.
This article explains the full three-step flow for adding keywords to an ad group. If you want to add keywords as negative keywords instead, see Add keywords as negative keywords.
Before you start
Keep the following in mind:
- You can add up to 30 keywords in a single operation.
- Keywords can only be added to one ad group at a time.
- Only search results campaigns are supported. Search tab, Today tab, and product page campaigns are not eligible.
- Automated ad groups cannot be selected as a destination.
- Keywords can be added to ad groups regardless of the ad group's status (Running, Paused, or On Hold).
- You can only work with campaigns and ad groups that belong to the Campaign Group currently selected in the top-right corner of AI Keyword Planner.
Step 1: Select an ad group
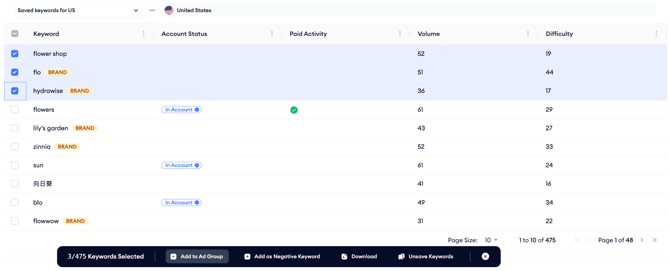
- Select the keywords you want to add from the Keyword List or the Saved Keywords table.
3. In the modal, select a campaign. Only search results campaigns are shown as active.
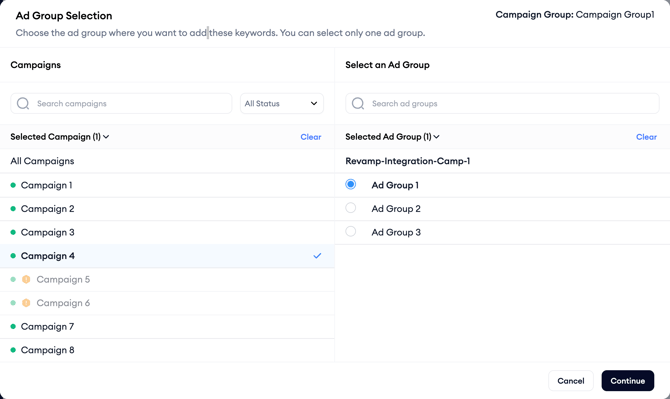
4. Select one ad group from the campaign. Only one ad group can be selected.
5. Click Continue.
Step 2: Configure keyword settings
On the Keyword Settings screen, configure the settings for each keyword before adding it.
- Match type: Select Broad Match or Exact Match. If you do not select a match type, the system assigns Broad Match by default.
- Bid amount: Optionally enter a keyword-level bid. If you leave this empty, the keyword inherits the Max CPT bid from the selected ad group. The bid must be greater than zero and no higher than the campaign's daily budget.
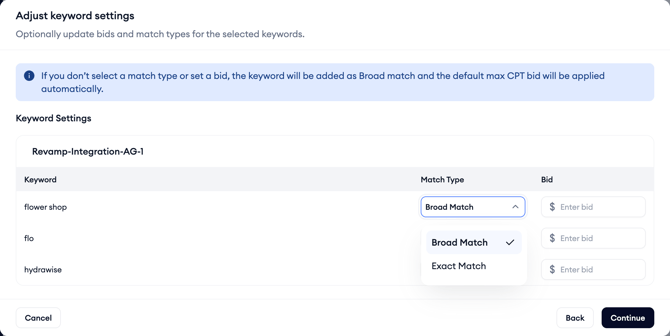
Note: If the selected ad group is under a Max Conversions campaign, the bid amount field will be disabled. Keywords added to these ad groups inherit the campaign's bidding settings.
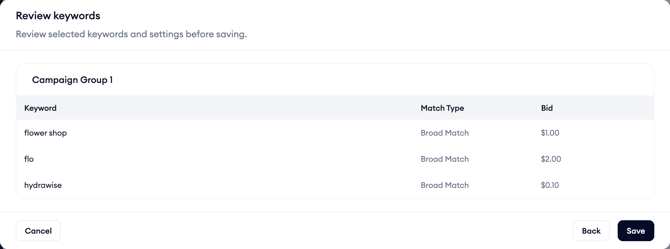
Review your settings and click Continue.
Step 3: Review and confirm
The Review screen shows all selected keywords before the action is executed. The system checks each keyword against the target ad group to detect potential conflicts.
If a keyword with the selected match type already exists in the target ad group, it is marked with a warning badge. You can remove it from the list using the inline remove action before proceeding. If you proceed without removing it, the system will attempt to add it and mark it as failed on the Activity screen.
- Review the keyword list. Remove any conflicting keywords if needed.
- Click Continue to execute the action.
What you see on the Activity screen
When the Add to Ad Group or Add as Negative Keyword action finishes, a confirmation screen appears showing the result for each keyword. This screen is shown once at the end of the operation and is not accessible again after you navigate away.
- Success: The keyword was added to the ad group.
- Failed: The keyword could not be added. The reason is shown next to the keyword. Common reasons include a duplicate match type in the ad group or an API error.
From the Activity screen, you can click Go to Ads Manager to continue managing your campaigns, or Back to Keyword Planner to return to the recommendation table. Your previously selected keywords remain selected when you return.
After you finish
Keywords you added successfully will appear in the ad group within Ads Manager. If a keyword you added later appears in a discovery session, it will be shown with an In Account badge.
Related links
Add keywords as negative keywords
Requirements and limits for AI Keyword Planner
Need more help?
If you have further questions, contact your dedicated Customer Success Manager or reach the support team via live chat.