
Bulk actions let you apply operations to multiple items at the same time across different layers of Ads Manager. Instead of opening each item individually, you can select multiple rows and choose an action from the Actions menu, such as activating or pausing items, updating keyword bids, copying keywords, uploading keywords, downloading data, or managing AI Smart Bidding settings.
This article explains how to use bulk actions and what actions are available at each layer.
How to perform bulk actions
From any layer in Ads Manager, select the checkboxes next to the rows you want to update. You can select individual rows or use the checkbox in the column header to select all visible rows at once.
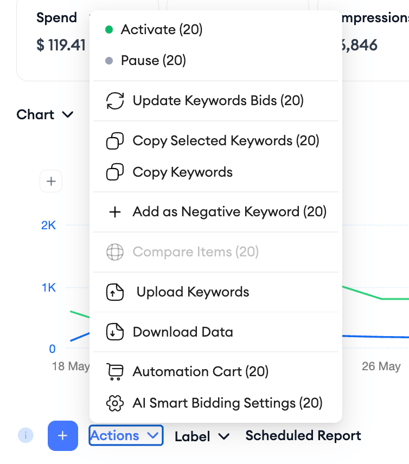
After selecting rows, click the Actions dropdown above the table. The available actions change depending on the layer you are viewing.
Select the action you want to apply. Some actions, such as Activate or Pause, apply to the selected items. Others, such as Update Keyword Bids, Copy Keywords, Upload Keywords, Download Data, or AI Smart Bidding Settings, open a follow-up panel where you can review or configure the change before saving or exporting.
Available bulk actions by layer
The actions available in the Actions menu change depending on which layer you are on.
| Layer | Available bulk actions |
|---|---|
| Campaign Groups | Duplicate, Compare Items, Update Keyword Bids, Download Data, Download Share of Voice Report |
| Campaigns | Activate, Pause, Edit, Delete, Duplicate, Update Keyword Bids, Upload Data, Download Data |
| Ad Groups | Activate, Pause, Edit, Delete, Duplicate, Update Keyword Bids, Copy Keywords, Upload Data, Download Data |
| Keywords | Activate, Pause, Update Keyword Bids, Copy Selected Keywords, Copy Keywords, Add as Negative Keyword, Upload Keywords, Download Data, Automation Cart, AI Smart Bidding Settings |
| Search Terms | Add as Keywords, Add as Negative Keywords, Add as Campaign Negative Keywords, Copy Selected Terms, Compare Items |
| Ads | Activate, Pause, Compare Items |
| CPP | Download Data, Compare Items |
| Negative Keywords | Delete, Copy Selected, Copy All, Upload, Download Data |
Actions worth noting
Update Keyword Bids
Update Keyword Bids is available at the Campaign Groups, Campaigns, Ad Groups, and Keywords layers. It lets you update keyword bid values in bulk instead of editing each keyword one by one.
When you update keyword bids from the Keywords layer, you can choose whether to apply the change to:
- Only Selected Data: Applies the change only to the keywords you selected.
- Current View: Applies the change to the items in your current view.
- All Data: Applies the change to all matching items.
You can then choose the bid update action and enter the amount. Depending on the selected items, the platform may also show a warning, such as when an ad group is under an active CPP A/B test and changing keyword bids is not recommended.
Copy Keywords
At the Keywords layer, you can use Copy Selected Keywords or Copy Keywords to copy keywords to another ad group.
The copy panel shows where the keywords are copied from, including the current campaign and ad group. Then you can select the destination campaign and ad group under Copy to before confirming the action.
Add as Negative Keyword
Add as Negative Keyword lets you convert selected keywords into negative keywords. You can choose the target level where the negative keywords will be applied, such as campaign or ad group level, before applying the change.
Upload Keywords
Upload Keywords lets you add or update keywords in bulk using a CSV file.
From the upload panel, you can download a formatted template, choose the file encoding, and upload your CSV file. For keywords in languages with non-ASCII characters, the CSV file should use UTF-8 encoding.
Keep in mind:
- The maximum bid amount is $1,000.00 for a keyword.
- The bid amount cannot exceed the campaign daily budget.
Download Data
Download Data exports keyword data from Ads Manager.
When downloading keyword data, you can choose whether to export:
- Only selected data
- Current view
- All data
You can also choose the reporting type before exporting. For example, the export panel may let you select an aggregated reporting type.
Automation Cart
Automation Cart at the Keywords layer is a staging area where you can review selected keywords before using them in automation workflows. The Automation Entity List shows the selected keywords and related details, such as currency, and lets you remove items before continuing.
AI Smart Bidding Settings
AI Smart Bidding Settings is available from the Keywords layer. It opens keyword-level AI Smart Bidding settings for the selected keywords.
To access it:
- Go to Ads Manager.
- Open the Keywords layer.
- Select the keywords you want to update.
- Click Actions.
- Select AI Smart Bidding Settings.
From this menu, you can choose:
- Freeze Keywords
- Unfreeze Keywords
- Set Individual Bid Limits
- Set Same Bid Limits
For detailed steps on freezing or unfreezing keywords and setting AI Smart Bidding bid limits, see How to manage AI Smart Bidding keyword settings in Ads Manager.
When setting bid limits, AI Smart Bidding follows the minimum and maximum limits you set for the selected keywords. You can set both limits, only the minimum, or only the maximum depending on your needs.
You can apply freeze, unfreeze, or bid limit changes to:
- Only Selected Data: Applies the change only to the items you selected.
- All Data: Applies the change to all items according to the current level and filters.
Keep in mind that these are keyword-level AI Smart Bidding settings managed from Ads Manager > Keywords > Actions > AI Smart Bidding Settings. They are different from setup-level controls such as Run, Pause, and Stop in the AI Smart Bidding table.
Compare Items
Compare Items is available at every layer of Ads Manager except Negative Keywords. It opens a chart in a modal that compares the performance of the selected items. Impressions is shown by default; the date range follows the Ads Manager date picker selection, and you can switch between line and bar view (line is the default) and between Daily, Weekly, and Monthly granularity (Daily is the default).
Related links
- Edit your campaigns in Ads Manager
- How to manage AI Smart Bidding keyword settings in Ads Manager
- Use Quick Edit in Ads Manager
- Add keywords to an ad group
- Ads Manager overview
Need more help?
If you have further questions, contact your dedicated Customer Success Manager or reach out via live chat.