---
title: Open Overview and set your filters
description: This article explains how to open the Overview dashboard, select the app you want to review, and set the date range for your data.
---
[Skip to content](https://helpcenter.mobileaction.co/en/open-overview-and-set-your-filters#main-content)
[](https://www.mobileaction.co/)
- [Website](https://www.mobileaction.co/)
- [Help Center](https://helpcenter.mobileaction.co/en)
Open main navigation
Close main navigation
- [Website](https://www.mobileaction.co/)
- [Help Center](https://helpcenter.mobileaction.co/en)
Advice and answers from the MobileAction Team
- There are no suggestions because the search field is empty.
1. [Help Center](https://helpcenter.mobileaction.co/en?hsLang=en)
2. [MobileAction CMP](https://helpcenter.mobileaction.co/en/mobileaction-cmp?hsLang=en)
3. [Overview](https://helpcenter.mobileaction.co/en/mobileaction-cmp?hsLang=en#overview)
# Open Overview and set your filters
This article explains how to open the Overview dashboard and set the campaign group, app, Goal, and date range filters that control the data shown across the page.
**Note:** The entire page updates dynamically based on your selected filters.
### Before you begin
- You must have an Apple Ads account integrated with the MobileAction CMP.
- You must have at least one campaign in your Apple Ads account for your app to appear in the MobileAction CMP.
### Open Overview
Log in to your MobileAction CMP account. Overview is the first item in the sidebar on the left side of the dashboard. Click it to open the Overview page.
#### Select your campaign group
At the top right of the page, you’ll find a **campaign group selector**. This determines which campaign group’s data you’re viewing across the entire page.
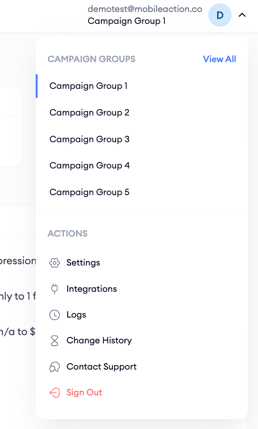
- When you first land on the page, it automatically shows your highest-spending campaign group from the last 30 days, so you see your most relevant data right away.
- You can switch to any other campaign group using the dropdown, but you can view only one campaign group at a time.
- If you manage more than 5 campaign groups, click **View All** to search and select from your full list by name.
- If your account has limited access permissions, you’ll only see the campaign groups you’re authorized to view.
#### Select your app
Use the **App** filter at the top of the page to choose which app you want to review.
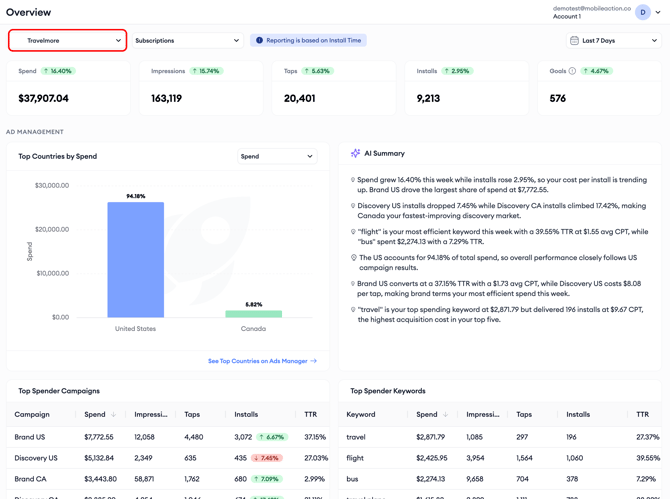
The filter displays all apps that belong to the selected campaign group, and the app with the highest spend over the last 30 days is selected by default.
If the selected campaign group contains multiple apps, you can choose a single app to analyze. Once selected, all metrics, charts, and reports on the Overview page update to reflect the chosen app.
#### Select a Goal
The **Goal** filter allows you to select an in-app event and display goal-related metrics throughout the Overview page.
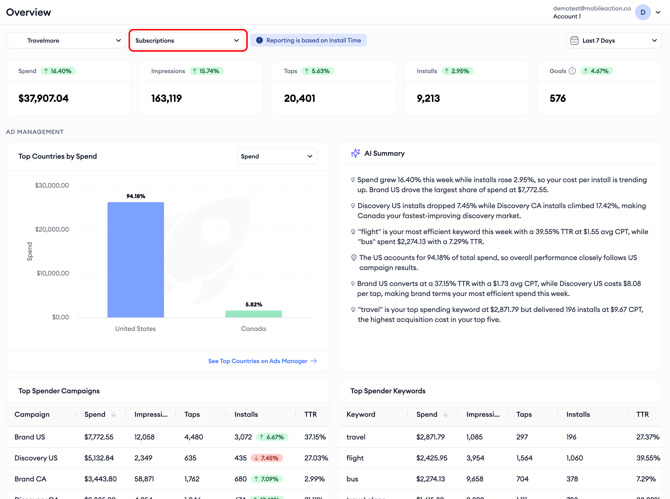
The available options depend on the selected app’s MMP integration status:
- **Valid MMP integration with at least one Goal:** You can select a Goal, and all goal-related metrics on the page update accordingly.
- **Valid MMP integration without a Goal:** You’ll see the option to go directly to the **Goals** page and create your first Goal.
- **No valid MMP integration:** Goal-related metrics are not available. To view Goal data, you must first integrate your MMP.
**Note:** Goal reporting is based on Install Time attribution. By default, the attribution settings use Tap-through as the claim type and Without Re-attribution. These settings are fixed and cannot be changed from the Overview page.
#### Set the date range
Use the date range selector to choose the time period you want to review. By default, the Overview page displays performance data for the **Last 7 Days**. Three options are available:
- Last 7 Days
- Last 14 Days
- Last 28 Days
Unless otherwise specified, all performance metrics, charts, and reports update based on the selected date range. Some metrics in the **Optimization** section use predefined reporting periods instead. See [Optimization widgets in Overview](https://helpcenter.mobileaction.co/en/optimization-widgets-in-overview?hsLang=en) for details.
**Note:** The percentage change figures shown alongside each metric compare the selected period against the equivalent previous period. For example, if you select **Last 7 Days**, the comparison is against the 7 days before that.
### Related links
- [Metric Summary in Overview](https://helpcenter.mobileaction.co/en/metric-summary-in-overview?hsLang=en)
- [Optimization widgets in Overview](https://helpcenter.mobileaction.co/en/optimization-widgets-in-overview?hsLang=en)
- [Overview FAQ](https://helpcenter.mobileaction.co/en/overview-faq?hsLang=en)
---
### Need more help?
If you have further questions, contact your dedicated **Customer Success Manager** or reach out via **live chat**.
- [Quick Guide to MobileAction](https://helpcenter.mobileaction.co/en/quick-guide-to-mobileaction?hsLang=en)
- [MobileAction CMP](https://helpcenter.mobileaction.co/en/mobileaction-cmp?hsLang=en#main-content)
- [Apple Ads Integration](https://helpcenter.mobileaction.co/en/mobileaction-cmp?hsLang=en#apple-ads-integration)
- [AI Assistant](https://helpcenter.mobileaction.co/en/mobileaction-cmp?hsLang=en#ai-assistant)
- [Overview](https://helpcenter.mobileaction.co/en/mobileaction-cmp?hsLang=en#overview)
- [Ads Manager](https://helpcenter.mobileaction.co/en/mobileaction-cmp?hsLang=en#ads-manager)
- [Automations](https://helpcenter.mobileaction.co/en/mobileaction-cmp?hsLang=en#automations)
- [CPP A/B Testing](https://helpcenter.mobileaction.co/en/mobileaction-cmp?hsLang=en#cpp-a-b-testing)
- [AI Keyword Planner](https://helpcenter.mobileaction.co/en/mobileaction-cmp?hsLang=en#ai-keyword-planner)
- [AI Smart Bidding](https://helpcenter.mobileaction.co/en/mobileaction-cmp?hsLang=en#ai-smart-bidding)
- [Budget Allocation](https://helpcenter.mobileaction.co/en/mobileaction-cmp?hsLang=en#budget-allocation)
- [Benchmarks](https://helpcenter.mobileaction.co/en/mobileaction-cmp?hsLang=en#benchmarks)
- [MMP Integration](https://helpcenter.mobileaction.co/en/mobileaction-cmp?hsLang=en#mmp-integration)
- [ASO Intelligence](https://helpcenter.mobileaction.co/en/aso-intelligence?hsLang=en#main-content)
- [Metadata Optimizer](https://helpcenter.mobileaction.co/en/aso-intelligence?hsLang=en#metadata-optimizer)
- [App Update Timeline](https://helpcenter.mobileaction.co/en/aso-intelligence?hsLang=en#app-update-timeline)
- [Creative Monitoring](https://helpcenter.mobileaction.co/en/aso-intelligence?hsLang=en#creative-monitoring)
- [Localization](https://helpcenter.mobileaction.co/en/aso-intelligence?hsLang=en#localization)
- [Keyword Tracking](https://helpcenter.mobileaction.co/en/aso-intelligence?hsLang=en#keyword-tracking)
- [Competitor Keywords](https://helpcenter.mobileaction.co/en/aso-intelligence?hsLang=en#competitor-keywords)
- [Keyword Inspector](https://helpcenter.mobileaction.co/en/aso-intelligence?hsLang=en#keyword-inspector)
- [Keyword Trends](https://helpcenter.mobileaction.co/en/aso-intelligence?hsLang=en#keyword-trends)
- [Keyword Translator](https://helpcenter.mobileaction.co/en/aso-intelligence?hsLang=en#keyword-translator)
- [Organic CPP Results](https://helpcenter.mobileaction.co/en/aso-intelligence?hsLang=en#organic-cpp-results)
- [ASO Report](https://helpcenter.mobileaction.co/en/aso-intelligence?hsLang=en#aso-report)
- [Visibility Report](https://helpcenter.mobileaction.co/en/aso-intelligence?hsLang=en#visibility-report)
- [Download Share](https://helpcenter.mobileaction.co/en/aso-intelligence?hsLang=en#download-share)
- [Store Analytics](https://helpcenter.mobileaction.co/en/store-analytics?hsLang=en#main-content)
- [Revenue Snapshot](https://helpcenter.mobileaction.co/en/store-analytics?hsLang=en#revenue-snapshot)
- [Organic Acquisition Dashboard](https://helpcenter.mobileaction.co/en/store-analytics?hsLang=en#organic-acquisition-dashboard)
- [Download Report](https://helpcenter.mobileaction.co/en/store-analytics?hsLang=en#download-report)
- [Conversion Funnel View](https://helpcenter.mobileaction.co/en/store-analytics?hsLang=en#conversion-funnel-view)
- [Analytics Overview](https://helpcenter.mobileaction.co/en/store-analytics?hsLang=en#analytics-overview)
- [Search Ads Intelligence](https://helpcenter.mobileaction.co/en/search-ads-intelligence?hsLang=en#main-content)
- [Search Result/App](https://helpcenter.mobileaction.co/en/search-ads-intelligence?hsLang=en#search-result-app)
- [Search Result/Keyword](https://helpcenter.mobileaction.co/en/search-ads-intelligence?hsLang=en#search-result-keyword)
- [Search Result/Competitor](https://helpcenter.mobileaction.co/en/search-ads-intelligence?hsLang=en#search-result-competitor)
- [Today Tab](https://helpcenter.mobileaction.co/en/search-ads-intelligence?hsLang=en#today-tab)
- [Search Tab](https://helpcenter.mobileaction.co/en/search-ads-intelligence?hsLang=en#search-tab)
- [Product Pages](https://helpcenter.mobileaction.co/en/search-ads-intelligence?hsLang=en#product-pages)
- [Top Advertisers](https://helpcenter.mobileaction.co/en/search-ads-intelligence?hsLang=en#top-advertisers)
- [CPP by Keyword](https://helpcenter.mobileaction.co/en/search-ads-intelligence?hsLang=en#cpp-by-keyword)
- [CPP by App](https://helpcenter.mobileaction.co/en/search-ads-intelligence?hsLang=en#cpp-by-app)
- [CPP by Category](https://helpcenter.mobileaction.co/en/search-ads-intelligence?hsLang=en#cpp-by-category)
- [CPP on Ad Networks](https://helpcenter.mobileaction.co/en/search-ads-intelligence?hsLang=en#cpp-on-ad-networks)
- [App Intelligence](https://helpcenter.mobileaction.co/en/app-intelligence?hsLang=en#main-content)
- [Compass Explore](https://helpcenter.mobileaction.co/en/app-intelligence?hsLang=en#compass-explore)
- [Compass Trace](https://helpcenter.mobileaction.co/en/app-intelligence?hsLang=en#compass-trace)
- [Compass Impact](https://helpcenter.mobileaction.co/en/app-intelligence?hsLang=en#compass-impact)
- [App Profile](https://helpcenter.mobileaction.co/en/app-intelligence?hsLang=en#app-profile)
- [Publisher Profile](https://helpcenter.mobileaction.co/en/app-intelligence?hsLang=en#publisher-profile)
- [Featured Apps](https://helpcenter.mobileaction.co/en/app-intelligence?hsLang=en#featured-apps)
- [Category Rankings](https://helpcenter.mobileaction.co/en/app-intelligence?hsLang=en#category-rankings)
- [Reviews](https://helpcenter.mobileaction.co/en/app-intelligence?hsLang=en#reviews)
- [AI Review Reply](https://helpcenter.mobileaction.co/en/app-intelligence?hsLang=en#ai-review-reply)
- [Ratings](https://helpcenter.mobileaction.co/en/app-intelligence?hsLang=en#ratings)
- [Similar Apps](https://helpcenter.mobileaction.co/en/app-intelligence?hsLang=en#similar-apps)
- [In-App Events](https://helpcenter.mobileaction.co/en/app-intelligence?hsLang=en#in-app-events)
- [Promotional Content](https://helpcenter.mobileaction.co/en/app-intelligence?hsLang=en#promotional-content)
- [Top Charts](https://helpcenter.mobileaction.co/en/app-intelligence?hsLang=en#top-charts)
- [Biggest Movers](https://helpcenter.mobileaction.co/en/app-intelligence?hsLang=en#biggest-movers)
- [Biggest Losers](https://helpcenter.mobileaction.co/en/app-intelligence?hsLang=en#biggest-losers)
- [Ad Intelligence](https://helpcenter.mobileaction.co/en/ad-intelligence?hsLang=en#main-content)
- [Creative Analysis](https://helpcenter.mobileaction.co/en/ad-intelligence?hsLang=en#creative-analysis)
- [Advertiser Analysis](https://helpcenter.mobileaction.co/en/ad-intelligence?hsLang=en#advertiser-analysis)
- [Ad Publisher Analysis](https://helpcenter.mobileaction.co/en/ad-intelligence?hsLang=en#ad-publisher-analysis)
- [Developer Analysis](https://helpcenter.mobileaction.co/en/ad-intelligence?hsLang=en#developer-analysis)
- [Top Advertisers](https://helpcenter.mobileaction.co/en/ad-intelligence?hsLang=en#top-advertisers)
- [Top Ad Publishers](https://helpcenter.mobileaction.co/en/ad-intelligence?hsLang=en#top-ad-publishers)
- [Top Creatives](https://helpcenter.mobileaction.co/en/ad-intelligence?hsLang=en#top-creatives)
- [Top Developers](https://helpcenter.mobileaction.co/en/ad-intelligence?hsLang=en#top-developers)
- [App Collections](https://helpcenter.mobileaction.co/en/ad-intelligence?hsLang=en#app-collections)
- [Creative Collections](https://helpcenter.mobileaction.co/en/ad-intelligence?hsLang=en#creative-collections)
- [Troubleshooting](https://helpcenter.mobileaction.co/en/troubleshooting?hsLang=en#main-content)
- [MobileAction CMP Troubleshooting](https://helpcenter.mobileaction.co/en/troubleshooting?hsLang=en#mobileaction-cmp-troubleshooting)
- [ASO Intelligence Troubleshooting](https://helpcenter.mobileaction.co/en/troubleshooting?hsLang=en#aso-intelligence-troubleshooting)
- [Search Ads Intelligence Troubleshooting](https://helpcenter.mobileaction.co/en/troubleshooting?hsLang=en#search-ads-intelligence-troubleshooting)
- [Integrations](https://helpcenter.mobileaction.co/en/integrations?hsLang=en#main-content)
- [MobileAction Integrations](https://helpcenter.mobileaction.co/en/integrations?hsLang=en#mobileaction-integrations)
- [SearchAds.com Integrations](https://helpcenter.mobileaction.co/en/integrations?hsLang=en#searchads-com-integrations)
- [SSO Configuration](https://helpcenter.mobileaction.co/en/integrations?hsLang=en#sso-configuration)
- [Settings](https://helpcenter.mobileaction.co/en/settings?hsLang=en#main-content)
- [MobileAction Settings](https://helpcenter.mobileaction.co/en/settings?hsLang=en#mobileaction-settings)
- [SearchAds.com Settings](https://helpcenter.mobileaction.co/en/settings?hsLang=en#searchads-com-settings)
- [Single Sign-On Configuration Guides](https://helpcenter.mobileaction.co/en/settings?hsLang=en#single-sign-on-configuration-guides)
[](https://www.mobileaction.co)
Build app store marketing on AI, automation and expertise
Copyright © 2025, MobileAction